
Connect FlowStudio MCP with a browser key
A browser key lets your agent work in any Power Automate tenant you can sign in to, on one FlowStudio subscription. Instead of FlowStudio calling Power Automate on your behalf, your agent’s calls run through your own browser, inside the session you are already signed in to. Your Power Automate token never leaves your browser, and there is nothing for an admin to approve.
The short version: Create a browser key on your dashboard, install the FlowStudio browser extension, paste the key into the extension to pair, and keep a Power Automate tab signed in. Your agent setup is identical to a regular key: same endpoint, same x-api-key header. |
When to use a browser key
Two cases.
You work in more than one organization. Consultants and managed service providers sign in to their clients’ tenants with an account in each. One browser key per client account covers all of them from a single FlowStudio subscription, and nothing has to be installed or approved inside the client’s tenant. See Working across several clients.
Your own tenant blocks the permission prompt. You click Connect next to Power Automate and Microsoft shows “approval required” or an error instead of the permission screen, or your admin cannot approve the FlowStudio permissions. A browser key gets you connected anyway.
Where the regular setup is available it is still the better default: connect the Power Automate and Power Apps permissions on your dashboard and generate a normal API key. It is faster per call and works with your browser closed.
Signing in to mcp.flowstudio.app itself is a separate, basic Microsoft sign-in. Tenants that block the Power Platform permissions usually still allow that, so you can reach your dashboard and create a browser key.
How it works
A browser key has no permissions of its own. When your agent makes a call with a browser key, the FlowStudio server hands the call to the FlowStudio extension in your browser. The extension runs it inside your signed-in Power Automate session and sends the result back. To Power Automate it looks like you clicking around the portal, because effectively it is.
Everything works over this path: listing environments and flows, reading run history and action outputs, and updating flow definitions.
Working across several clients
A browser key binds to the first Microsoft account that uses it and stays with that account. Your dashboard shows the tenant and account each key is bound to, so you can tell your clients apart at a glance.
The pattern is one key per client account:
- Create a key on your dashboard for each client and label it with the client’s name.
- Sign in to that client’s Power Automate in your browser, paste that client’s key into the extension, and point your agent’s
x-api-keyat the same key. - When an engagement ends, revoke that client’s key. Nothing else is affected.
The extension holds one key at a time per browser profile. If you need two clients open at once, use a separate browser profile for each, signed in to that client’s Power Automate with that client’s key paired. Otherwise paste the other key when you switch.
Your agent can only reach what that account can already reach in Power Automate. A key gives it no access of its own.
Step 1: create a browser key
- Sign in at mcp.flowstudio.app/dashboard with your Microsoft account.
- Find the Browser keys card. Give the key a label, like “Work laptop”, and click Create key.
- Copy the key. It stays visible on your dashboard, so you can come back and copy it again later.
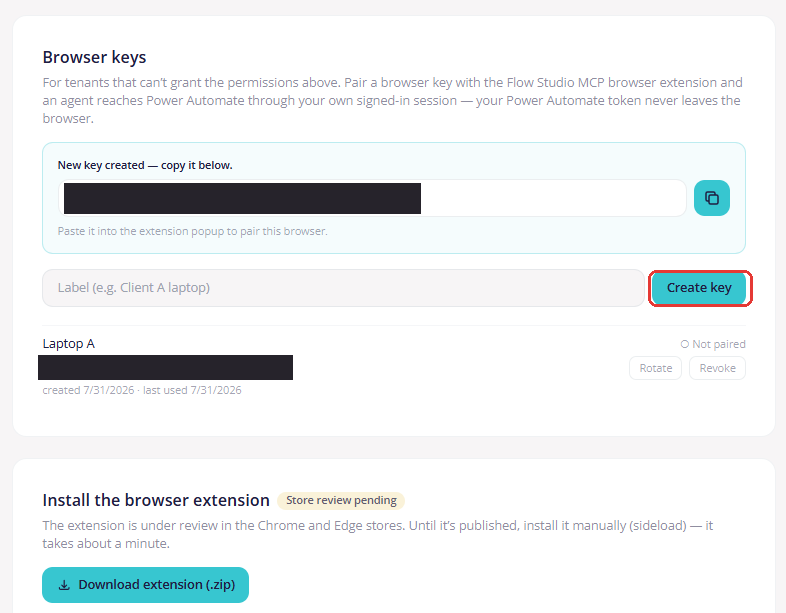
Figure: Create a browser key on the dashboard - the key stays visible so you can copy it again later
Step 2: install the browser extension
The extension is live in the Chrome Web Store. Open the FlowStudio browser extension listing and click Add to Chrome. That is the whole step.
Using Edge? Our Edge Add-ons listing is still under review. Edge can install from the Chrome Web Store in the meantime: open the link above in Edge and choose Allow extensions from other stores when Edge offers it.
If your organization blocks store installs
Install it by hand instead. It takes about a minute. Download the extension zip from the Install the browser extension card on your dashboard, then:
Chrome
- Unzip the download to a folder you will keep.
- Open
chrome://extensions. - Turn on Developer mode (top right).
- Click Load unpacked and choose the unzipped folder.

Figure: Chrome - turn on Developer mode (top right), then click Load unpacked
Edge
- Unzip the download to a folder you will keep.
- Open
edge://extensions. - Turn on Developer mode (left sidebar).
- Click Load unpacked and choose the unzipped folder.
Keep the unzipped folder where it is. Deleting or moving it removes the extension. If your organization disables Developer mode too, ask IT to allowlist the extension ID loaknnehojomdamokpacggbnlcddeagl so you can install it from the Chrome Web Store.
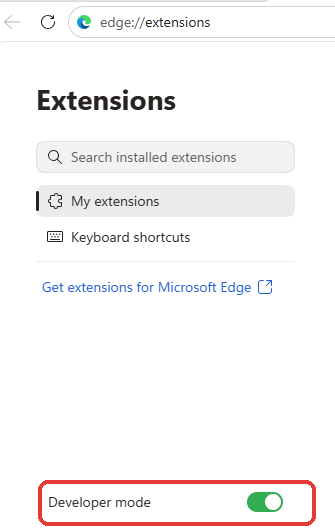
Figure: Edge - turn on Developer mode (bottom of the left sidebar), then click Load unpacked
Step 3: pair your browser
- Pin the FlowStudio icon in your browser toolbar.
- Click the icon and paste your browser key into the popup.
- Open make.powerautomate.com and sign in. Keep this tab around; the extension works through it.
The key pairs with the first Microsoft account that uses it. If a different account tries to pair the same key, it is rejected. That is deliberate: one key means one identity, so create a separate key for each account you sign in with. See Working across several clients.
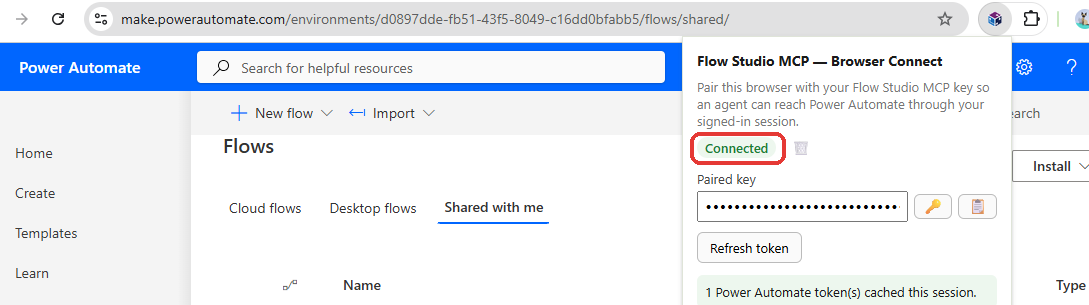
Figure: Paired and Connected - the extension works through your signed-in Power Automate tab
Step 4: connect your agent
Configure your agent exactly like a regular key: endpoint https://mcp.flowstudio.app/mcp, header x-api-key, value your browser key. Per-agent setup for Claude, Copilot, Codex, Cursor, and more is in Getting Started with FlowStudio MCP; only the key value changes.
Test it: ask your agent to “List my Power Platform environments” while your Power Automate tab is open.
What to expect
- Calls are slower. Every call makes a round trip through your browser, which adds a second or two. Listing operations that page through many flows take noticeably longer than on a regular key.
- Your browser has to be open. If the extension is not running or your Power Automate tab is signed out, calls fail immediately with a message telling you to reopen the tab. Nothing hangs; fix the tab and try again.
- Calls count against your plan the same as with a regular key.
Rotate or revoke a key
Both are on the key’s row on the Browser keys card.
- Rotate gives the key a new secret and keeps its label and pairing. Paste the new value into the extension popup on the paired browser and update it in your agent config; the old value stops working within about a minute.
- Revoke kills the key. The paired browser stops working within about a minute.
Troubleshooting
|
Related guides
- Getting Started with FlowStudio MCP: per-agent setup for Claude, Copilot, Codex, and more
- Tenant plan admin guide: consent and keys for Team and Business plans
- FlowStudio MCP plans and pricing