---
title: "Install FlowStudio MCP for Power Automate: AI agent setup"
description: "Get started with FlowStudio MCP: an MCP server for Power Automate. Connect ChatGPT, Copilot, Claude, or Codex to your Power Automate flows in minutes."
---
[Skip to content](https://learn.flowstudio.app/mcp-getting-started#main-content)
[](https://flowstudio.app)
- [FlowStudio App](https://learn.flowstudio.app/)
Show submenu for FlowStudio App
- [Getting Started](https://learn.flowstudio.app/getting-started)
- [Full Text Search](https://learn.flowstudio.app/full-text-search)
- [Flow Diagram](https://learn.flowstudio.app/flow-diagram)
- [Clipboard & Library](https://learn.flowstudio.app/clipboard)
- [Restore a Flow](https://learn.flowstudio.app/restore-power-automate)
- [Migrate and Deploy](https://learn.flowstudio.app/migrate-flows)
- [Bulk Export Flows](https://learn.flowstudio.app/bulk-export-flows)
- [More Info for IT](https://learn.flowstudio.app/more-info-for-it)
- [MCP](https://learn.flowstudio.app/mcp-getting-started)
Show submenu for MCP
- [Getting Started](https://learn.flowstudio.app/mcp-getting-started)
- [Which Agent to Use](https://learn.flowstudio.app/mcp-which-agent-power-automate)
- [Connect Without Admin Consent](https://learn.flowstudio.app/mcp-browser-key)
- [Build Flows with AI](https://learn.flowstudio.app/build-power-automate-flows-with-ai-agents)
- [Vibe Code Flows](https://learn.flowstudio.app/vibe-code-power-automate)
- [Power Automate in VS Code](https://learn.flowstudio.app/power-automate-ide)
- [Debug Flows](https://learn.flowstudio.app/mcp-debug)
- [MCP Tools Reference](https://learn.flowstudio.app/mcp-tools)
- [Copilot Agent Skills](https://learn.flowstudio.app/mcp-copilot-skills)
- [Compare with Microsoft MCP](https://learn.flowstudio.app/compare/flowstudio-mcp-vs-microsoft-power-automate-mcp)
- [Pricing & Plans](https://learn.flowstudio.app/mcp-pricing)
- [Manage Tenant Plan](https://learn.flowstudio.app/mcp-tenant-plan-admin)
- [FlowStudio AI](https://learn.flowstudio.app/flowstudio-ai)
- [Teams](https://learn.flowstudio.app/flowstudio-for-teams)
Show submenu for Teams
- [Manage Workspace](https://learn.flowstudio.app/teams-workspace)
- [Adding Permissions](https://learn.flowstudio.app/teams-add-permission)
- [Flow Monitoring](https://learn.flowstudio.app/teams-monitoring)
- [Flow Report](https://learn.flowstudio.app/teams-report)
- [Blog](https://learn.flowstudio.app/blog)
- [FAQ](https://learn.flowstudio.app/faq)
- [Personal Data](https://learn.flowstudio.app/personal-data)
Open main navigation
Close main navigation
- [FlowStudio App](https://learn.flowstudio.app/)
Show submenu for FlowStudio App
- [Getting Started](https://learn.flowstudio.app/getting-started)
- [Full Text Search](https://learn.flowstudio.app/full-text-search)
- [Flow Diagram](https://learn.flowstudio.app/flow-diagram)
- [Clipboard & Library](https://learn.flowstudio.app/clipboard)
- [Restore a Flow](https://learn.flowstudio.app/restore-power-automate)
- [Migrate and Deploy](https://learn.flowstudio.app/migrate-flows)
- [Bulk Export Flows](https://learn.flowstudio.app/bulk-export-flows)
- [More Info for IT](https://learn.flowstudio.app/more-info-for-it)
- [MCP](https://learn.flowstudio.app/mcp-getting-started)
Show submenu for MCP
- [Getting Started](https://learn.flowstudio.app/mcp-getting-started)
- [Which Agent to Use](https://learn.flowstudio.app/mcp-which-agent-power-automate)
- [Connect Without Admin Consent](https://learn.flowstudio.app/mcp-browser-key)
- [Build Flows with AI](https://learn.flowstudio.app/build-power-automate-flows-with-ai-agents)
- [Vibe Code Flows](https://learn.flowstudio.app/vibe-code-power-automate)
- [Power Automate in VS Code](https://learn.flowstudio.app/power-automate-ide)
- [Debug Flows](https://learn.flowstudio.app/mcp-debug)
- [MCP Tools Reference](https://learn.flowstudio.app/mcp-tools)
- [Copilot Agent Skills](https://learn.flowstudio.app/mcp-copilot-skills)
- [Compare with Microsoft MCP](https://learn.flowstudio.app/compare/flowstudio-mcp-vs-microsoft-power-automate-mcp)
- [Pricing & Plans](https://learn.flowstudio.app/mcp-pricing)
- [Manage Tenant Plan](https://learn.flowstudio.app/mcp-tenant-plan-admin)
- [FlowStudio AI](https://learn.flowstudio.app/flowstudio-ai)
- [Teams](https://learn.flowstudio.app/flowstudio-for-teams)
Show submenu for Teams
- [Manage Workspace](https://learn.flowstudio.app/teams-workspace)
- [Adding Permissions](https://learn.flowstudio.app/teams-add-permission)
- [Flow Monitoring](https://learn.flowstudio.app/teams-monitoring)
- [Flow Report](https://learn.flowstudio.app/teams-report)
- [Blog](https://learn.flowstudio.app/blog)
- [FAQ](https://learn.flowstudio.app/faq)
- [Personal Data](https://learn.flowstudio.app/personal-data)
Contact Us
# Install FlowStudio MCP for Power Automate
**Not sure which agent to use?** Compare ChatGPT, Microsoft 365 Copilot Cowork, IDE agents (Claude, Codex, GitHub Copilot), and Copilot Studio in [Which AI agent should you use with FlowStudio MCP?](https://learn.flowstudio.app/mcp-which-agent-power-automate?hsLang=en)
Want nothing to set up? [FlowStudio AI](https://learn.flowstudio.app/flowstudio-ai?hsLang=en) is the hosted version: sign in and ask.
✨ Set up in 2 minutes, watch below• As featured on Microsoft’s The Low Code Revolution
Video: Power Automate Setup for AI Agents in 60 Seconds (Claude + GitHub Copilot) (2 min)
## What is FlowStudio MCP?
[FlowStudio MCP](https://mcp.flowstudio.app?utm_source=hubspot&utm_medium=content&utm_campaign=learn-getting-started) is an MCP server for Power Automate, a cloud service that lets AI agents build, debug, deploy, and monitor your flows without you opening the Power Automate portal. It also [reads, creates and edits Power Apps canvas apps](https://learn.flowstudio.app/power-apps-mcp?hsLang=en), in Preview, included in every account and free until 30 November 2026.
You talk to your AI agent in natural language. The agent talks to FlowStudio MCP. FlowStudio MCP talks to the Power Platform APIs on your behalf.
**Figure:** How it fits together: you talk to your AI agent, the agent calls FlowStudio MCP, and FlowStudio MCP calls the Power Platform APIs on your behalf.
## What you can do
Once connected, you can ask your agent to do things like:
| You say | What happens |
| --- | --- |
| *“List my Power Automate flows”* | Agent returns all flows in your environment with their status and trigger type |
| *“Why is my HR Sync flow failing?”* | Agent inspects the failed run, finds the root cause action, and shows you the actual error message |
| *“Fix the expression error and redeploy”* | Agent patches the flow definition and deploys the fix, one round-trip |
| *“Build a flow that checks the Invoices SharePoint list every Monday, filters for overdue items, sends an approval to the Finance manager, and if approved posts a summary to the Accounts Payable Teams channel”* | Agent discovers your connections, constructs the full flow with recurrence trigger, SharePoint filter query, approval action, condition branch, and Teams post, then deploys it |
| *“Show me the last 5 runs of my Daily Report flow”* | Agent returns run history with status, timestamps, and errors |
| *“Resubmit the failed run”* | Agent re-runs the flow using the original trigger payload |
For the full list of 30+ tools available, see [MCP Tools Reference](https://learn.flowstudio.app/mcp-tools?hsLang=en).
**Using ChatGPT or Claude?** You do not need an API key. Add FlowStudio as a connector and sign in through your browser instead: [Add FlowStudio to ChatGPT or Claude](https://learn.flowstudio.app/mcp-connect-chatgpt-claude?hsLang=en). What ChatGPT can do once connected: [ChatGPT for Power Automate](https://learn.flowstudio.app/chatgpt-power-automate?hsLang=en). The rest of this guide covers the agents that use a key.
## What you need
- A Microsoft account with access to Power Automate environments
- An MCP-compatible AI agent, including but not limited to ChatGPT, Copilot Studio Agent, GitHub Copilot, Claude and Codex.
- A [FlowStudio MCP](https://mcp.flowstudio.app?utm_source=hubspot&utm_medium=content&utm_campaign=learn-getting-started) account (free evaluation, 100 calls over 21 days, no credit card)
## Step 1, Subscribe and get your API key
**1a. Sign up and activate**
Go to [mcp.flowstudio.app](https://mcp.flowstudio.app?utm_source=hubspot&utm_medium=content&utm_campaign=learn-getting-started) and click **Get Started**. Sign in with your Microsoft account.
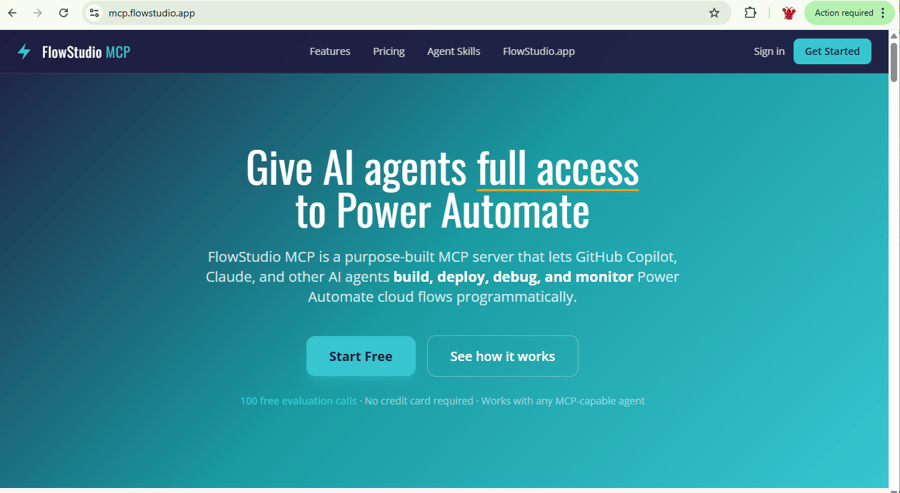**Figure:** The FlowStudio MCP landing page. Click Get Started and sign in with your Microsoft account.
On the Dashboard, click **Start Free, 100 calls** to activate the free evaluation. No credit card required. You get 100 API calls over 21 days.
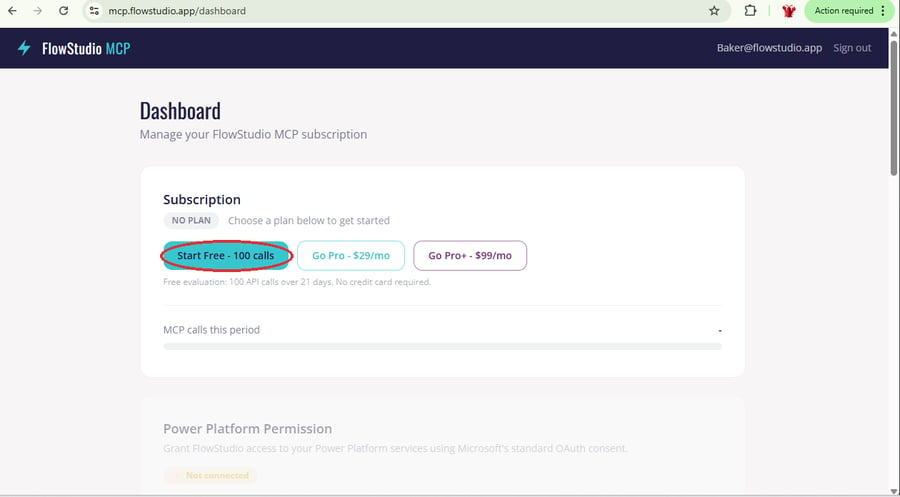**Figure:** The dashboard in its no-plan state. Click Start Free, 100 calls to activate the free evaluation. 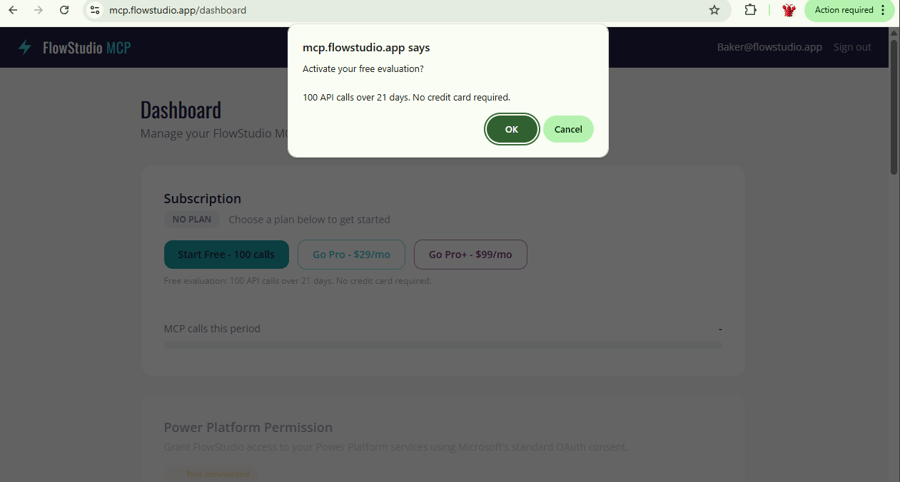**Figure:** The activation dialog confirming 100 API calls over 21 days, no credit card required.
**1b. Grant Power Platform permissions**
FlowStudio needs access to your Power Automate and Power Apps services. This uses Microsoft’s standard OAuth consent, we never see your password.
1. Click **Connect** next to **Power Automate**, you will be redirected to Microsoft to authorize
2. After Power Automate is connected, click **Continue setup** next to **Power Apps** to complete the second authorization
Both services must show **Connected** before you can generate your API key.
**If your organization blocks these permission prompts**, you can still connect. A browser key works through your own signed-in browser session instead, and there is nothing for an admin to approve. See [Connect with a browser key](https://learn.flowstudio.app/mcp-browser-key?hsLang=en).
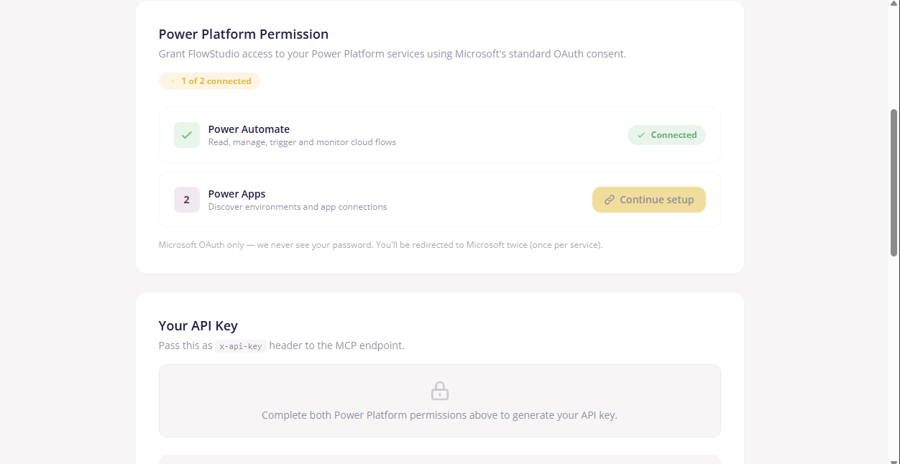**Figure:** Power Platform permissions: both services must show Connected before you can generate your API key.
**1c. Copy your API key**
Once both permissions are connected, your API key appears in the **Your API Key** section. Click the copy button to copy it. You will need this for Step 2.
The dashboard also shows your **MCP endpoint** (`https://mcp.flowstudio.app/mcp`) and a **Quick start** JSON config you can copy directly into your agent.
Further down, the **Agent tools** card holds one switch that starts off: **Let your agent delete flows**. Your agent cannot see the delete and restore tools until you switch it on, and it reads the tool list once when it connects, so reconnect it after changing the switch. Everything else on the [tools reference](https://learn.flowstudio.app/mcp-tools?hsLang=en), the Power Apps canvas tools included, is on from the start.
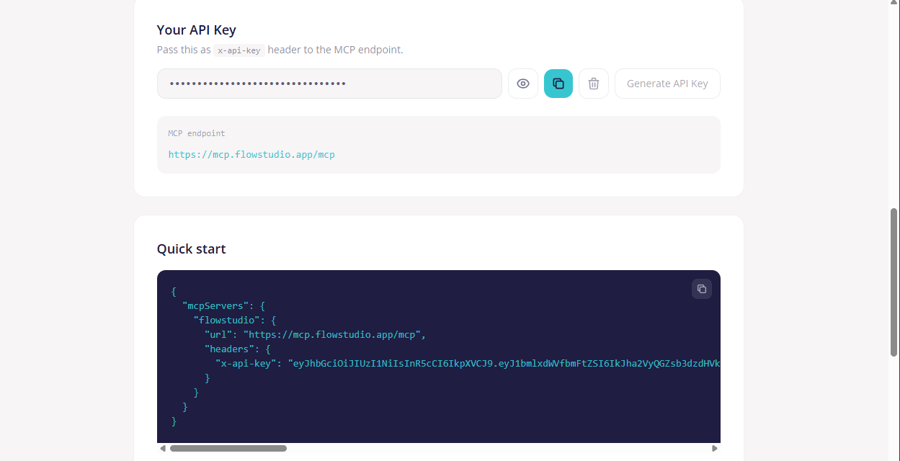**Figure:** Your API Key section, with the masked key, the MCP server URL, and a quick-start JSON config to copy.
## Step 2, Configure your agent
Your API key is a JWT token. The setup is different for each agent. The fastest options are listed first:
Quick install
**VS Code users:** Install the [Power Automate MCP Server](https://marketplace.visualstudio.com/items?itemName=FlowStudio.flowstudio-mcp) extension from the VS Code Marketplace. It stores your API key securely in your OS keychain, supports multiple tenants, and works with GitHub Copilot Chat automatically. No JSON config files needed.
**Claude Code users:** Two install paths, pick whichever fits. **Easiest:** install the [Power Automate MCP for Claude Code](https://marketplace.visualstudio.com/items?itemName=FlowStudio.flowstudio-mcp-claude) extension via the VS Code Marketplace (or [Open VSX](https://open-vsx.org/extension/FlowStudio/flowstudio-mcp-claude)) for one-click setup. **No editor needed:** install the FlowStudio plugin directly via the Claude CLI, see [Claude Code](https://learn.flowstudio.app/mcp-getting-started#claude) below. Either path gives you the same MCP connection and 5 bundled skills, and they work in Claude Code via VS Code, terminal (`claude` CLI), and Desktop.
For manual configuration or other agents, follow the guide for the agent you use:
**Jump to your agent:** [Copilot Studio](https://learn.flowstudio.app/mcp-getting-started#copilot-studio) [GitHub Copilot (VS Code)](https://learn.flowstudio.app/mcp-getting-started#github-copilot) [Claude Code](https://learn.flowstudio.app/mcp-getting-started#claude) [Claude Desktop](https://learn.flowstudio.app/mcp-getting-started#claude-desktop) [OpenAI Codex](https://learn.flowstudio.app/mcp-getting-started#codex) [Other agents](https://learn.flowstudio.app/mcp-getting-started#other-agents)
### Microsoft Copilot Studio for Power Automate
Wire FlowStudio MCP into a Copilot Studio agent and any M365 Copilot user in your tenant can use it from Teams chat or m365.cloud.microsoft, with no install on their side.
1. Open [copilotstudio.microsoft.com](https://copilotstudio.microsoft.com), create a new agent (or open an existing one), and go to the **Tools** tab.
2. Click **+ Add a tool** → in the **Create new** row, click the **Model Context Protocol** card.
3. Fill the form: **Server URL** `https://mcp.flowstudio.app/mcp`, **Authentication** = API key, **Type** = Header, **Header name** = `x-api-key` (lowercase, with the hyphen, this is the most common setup mistake). Click **Create.**
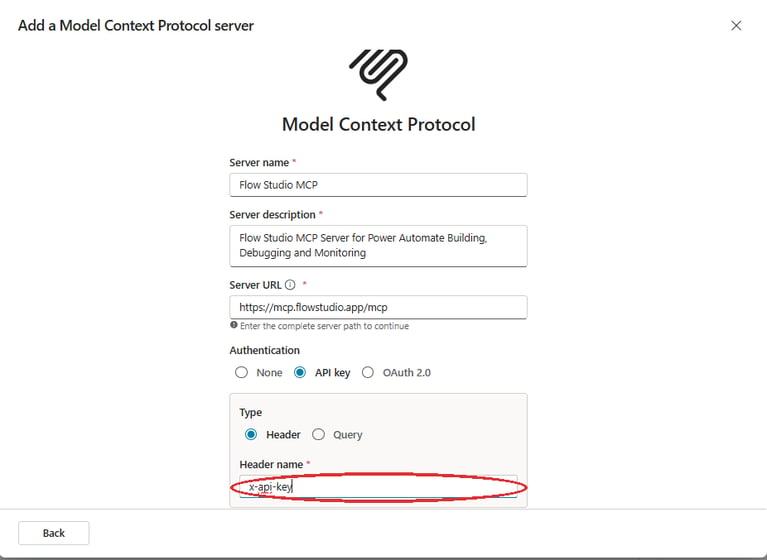**Figure:** The Copilot Studio Add a tool form: server URL, API key authentication, and Header name x-api-key.
4. When asked to Create new connection, paste your API key from the [dashboard](https://mcp.flowstudio.app/dashboard?utm_source=hubspot&utm_medium=content&utm_campaign=learn-getting-started) and click **Create**.
5. Click **Publish** in the top right and pick the **Microsoft Teams and Microsoft 365 Copilot** channels.
### Set up GitHub Copilot in VS Code
Full guide: [GitHub Copilot for Power Automate with FlowStudio MCP](https://learn.flowstudio.app/github-copilot-power-automate?hsLang=en)
**Recommended:** Install the [Power Automate MCP Server](https://marketplace.visualstudio.com/items?itemName=FlowStudio.flowstudio-mcp) extension from the VS Code Marketplace. Open VS Code, press `Ctrl+Shift+X`, search for **"FlowStudio MCP"**, and click Install. The extension walks you through adding your API key and stores it securely in your OS keychain (Windows Credential Manager / macOS Keychain). It supports multiple tenant connections and registers the MCP server with Copilot Chat automatically.
**Alternative (manual JSON):** Create or open **.vscode/mcp.json** in your project root and add:
```
{
"servers": {
"flowstudio": {
"url": "https://mcp.flowstudio.app/mcp",
"headers": {
"x-api-key": ""
}
}
}
}
```
Replace `` with the API key from your dashboard. VS Code will show **Running** with 30+ tools when the connection succeeds. To avoid committing your key to source control, add `.vscode/mcp.json` to your `.gitignore`, or use the global config via **MCP: Open User Configuration** command.
Optionally, install our [pre-built Copilot agent skills](https://github.com/ninihen1/power-automate-mcp-skills) for guided workflows. Copy the skill folders into your project’s **.github/skills/** directory. See [Copilot Agent Skills](https://learn.flowstudio.app/mcp-copilot-skills?hsLang=en) for details.
### Set up Claude Code
Full guide: [Claude for Power Automate with FlowStudio MCP](https://learn.flowstudio.app/claude-power-automate?hsLang=en)
Claude Code runs in three places: inside an editor (VS Code, Cursor, VSCodium, Windsurf), in the terminal as the `claude` CLI, and as a Desktop app. All three read from the same user-scope config under `~/.claude/`, so a single one-time setup configures the MCP connection everywhere. Three install paths, all first-class, pick whichever fits your workflow:
**Option 1, VS Code extension (one-click, easiest if you already use VS Code / Cursor / VSCodium / Windsurf):** Install the [Power Automate MCP for Claude Code](https://marketplace.visualstudio.com/items?itemName=FlowStudio.flowstudio-mcp-claude) extension from the VS Code Marketplace. (Cursor, VSCodium, and Windsurf users: install from [Open VSX](https://open-vsx.org/extension/FlowStudio/flowstudio-mcp-claude).) The extension uses VS Code purely as the install interface, after setup, the connection works wherever Claude Code runs.
1. Install the extension from the VS Code Marketplace (or Open VSX mirror).
2. Get an API key at [mcp.flowstudio.app](https://mcp.flowstudio.app?utm_source=hubspot&utm_medium=content&utm_campaign=learn-getting-started), free to start, 100 calls included.
3. In VS Code, open the command palette and run **FlowStudio (Claude): Add Tenant Connection**. Enter a tenant name and paste your API key.
4. Reload the window. Claude Code in VS Code, in the terminal, and on Desktop all pick up the new MCP server and the 5 bundled skills (`power-automate-mcp`, `power-automate-debug`, `power-automate-build`, `power-automate-monitoring`, `power-automate-governance`).
The extension writes to `~/.claude/skills/` (skills) and `~/.claude.json` (MCP server entry). It also adds **FlowStudio (Claude): Remove** and **List Tenant Connections** commands for managing multiple tenants.
**Option 2, Plugin install via the Claude CLI (no editor required):** Same 5 skills and same MCP connection as Option 1, installed from the terminal. Use this if you don't run a supported editor, or if you just prefer the CLI:
```
git clone https://github.com/ninihen1/power-automate-mcp-skills.git
claude --plugin-dir ./power-automate-mcp-skills
```
Then connect the MCP server:
```
claude mcp add --transport http flowstudio https://mcp.flowstudio.app/mcp \
--header "x-api-key: "
```
**Option 3, Manual JSON config (MCP connection only, no skills):** If you only want the MCP server connection (without the agent skills) or want full control over the config, edit Claude Code's config directly. Add the following to **.mcp.json** in your project root (or **~/.claude.json** for user-level):
```
{
"mcpServers": {
"flowstudio": {
"type": "http",
"url": "https://mcp.flowstudio.app/mcp",
"headers": {
"x-api-key": "${FLOWSTUDIO_API_KEY}"
}
}
}
}
```
Set the environment variable before running Claude Code:
```
export FLOWSTUDIO_API_KEY=""
```
Claude Code supports `${VAR}` syntax for environment variable expansion in headers.
### Set up Claude Desktop
Full guide: [Claude for Power Automate with FlowStudio MCP](https://learn.flowstudio.app/claude-power-automate?hsLang=en)
Claude Desktop does **not** natively connect to remote HTTP MCP servers via config. You need the `mcp-remote` package as a bridge (requires Node.js).
Open your config file:
- **Windows:** `%APPDATA%\Claude\claude_desktop_config.json`
- **macOS:** `~/Library/Application Support/Claude/claude_desktop_config.json`
Add the following:
```
{
"mcpServers": {
"flowstudio": {
"command": "npx",
"args": [
"mcp-remote@latest",
"https://mcp.flowstudio.app/mcp",
"--header",
"x-api-key: YOUR_API_KEY",
"--header",
"User-Agent: FlowStudio-MCP/1.0"
]
}
}
}
```
Replace `YOUR_API_KEY` with the API key you copied from the dashboard. Restart Claude Desktop after saving the file. You can also add the server via **Settings \> Connectors \> Add** to avoid editing JSON.
### OpenAI Codex for Power Automate
Codex runs as both a desktop app (UI configuration) and a CLI (config.toml). Both use the same MCP endpoint and require the `x-api-key` header.
**Codex Desktop app (recommended, UI configuration):** Open **Settings \> MCP servers \> Add server** and fill in the form:
- **URL:** `https://mcp.flowstudio.app/mcp`
- **Bearer token env var:** leave empty. Do **not** use this field, it sends an `Authorization: Bearer` header, which FlowStudio does not accept.
- **Header, name `x-api-key` (lowercase, with the hyphen).** Two ways to provide the value:
- **Direct:** in the **Headers** section, add a row with Key `x-api-key` and paste your API key (the JWT) into the Value field.
- **Via env var (recommended):** in the **Headers from environment variables** section, add a row with Key `x-api-key` and Value `FLOWSTUDIO_API_KEY` (or any env var name you choose). Then set that env var on your machine before launching Codex (`export FLOWSTUDIO_API_KEY=""` on macOS/Linux, or the equivalent on Windows). This keeps the JWT out of the config UI and out of any synced settings.
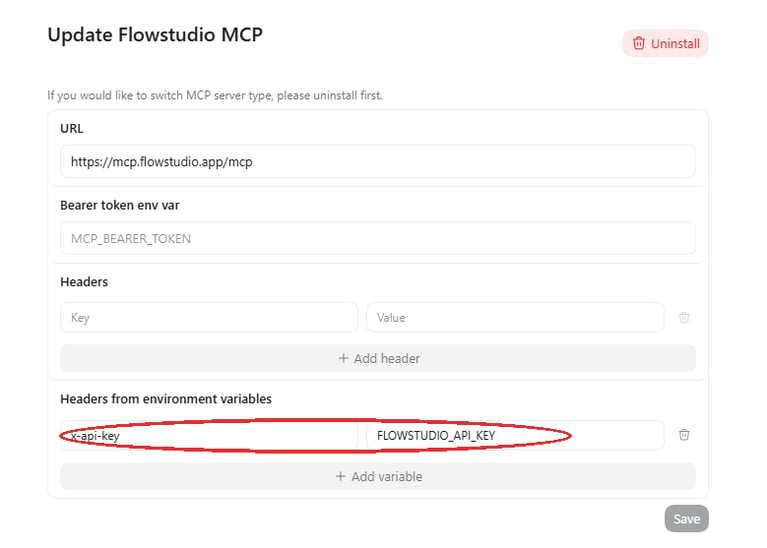**Figure:** The Codex Desktop MCP server form, with the key added as an x-api-key header row.
Click **Save**. The Codex Desktop app will pick up the connection immediately, no app restart needed.
**Codex CLI (config.toml):** Add the following to your **~/.codex/config.toml** (global) or **.codex/config.toml** (project):
```
[mcp_servers.flowstudio]
url = "https://mcp.flowstudio.app/mcp"
startup_timeout_sec = 10
tool_timeout_sec = 120
[mcp_servers.flowstudio.env_http_headers]
x-api-key = "FLOWSTUDIO_API_KEY"
```
Then set your API key as an environment variable:
```
export FLOWSTUDIO_API_KEY=""
```
The `env_http_headers` section maps header names to environment variable names, Codex reads the value at runtime.
**Important:** Do **not** use `bearer_token_env_var`. That sends an `Authorization: Bearer` header, which FlowStudio does not accept. Use `env_http_headers` with `x-api-key` as shown above.
**Codex network access (CLI):** Codex CLI blocks network access by default. You need to enable internet access for your environment and add **mcp.flowstudio.app** to the domain allowlist. Without this, Codex CLI cannot reach the MCP server. (The Desktop app does not have this restriction by default.)
### Other MCP-compatible agents for Power Automate
For agents that don’t have native MCP configuration (or for “simpler” agents), you can give them the connection details directly. Paste the following into your agent’s system prompt or first message:
```
Endpoint: https://mcp.flowstudio.app/mcp
Protocol: JSON-RPC 2.0 over HTTP POST
Transport: Streamable HTTP, single POST per request, no SSE, no WebSocket
Auth: x-api-key header (NOT Authorization: Bearer)
Required headers:
Content-Type: application/json
x-api-key:
User-Agent: FlowStudio-MCP/1.0
Step 1, Discover tools:
POST {"jsonrpc":"2.0","id":1,"method":"tools/list","params":{}}
→ returns all tools with names, descriptions, and input schemas
→ free, not counted against plan limits
Step 2, Call a tool:
POST {"jsonrpc":"2.0","id":1,"method":"tools/call",
"params":{"name":"","arguments":{...}}}
Response shape:
Success → {"result":{"content":[{"type":"text","text":""}]}}
Error → {"result":{"content":[{"type":"text","text":"{\"error\":{...}}"}]}}
Always parse result.content[0].text as JSON to get the actual data.
```
This approach works with any agent that can make HTTP requests, no MCP SDK required. It is the most reliable method for agents that do not natively support MCP configuration.
**Important:** The auth header is **x-api-key**, not `Authorization: Bearer`. This is the most common setup mistake.
## Step 3, Try your first command
Once configured, start a conversation with your agent and try:
*“List my Power Platform environments”*
If the connection is working, you will see your environments with their names, regions, and SKUs. This confirms that your agent can reach FlowStudio MCP and your API key is valid.
Then try:
*“List my flows in the default environment”*
Power Platform organizes resources into environments. Most users have a default environment where their flows live.
*“Show me the last 5 runs of \[flow name\]”*
*“What errors occurred in my most recent failed flow run?”*
## How to talk to your agent
You do not need to know tool names or API details. Just describe what you want in plain language. Here are some tips:
**Be specific about which flow.** Say the flow name: *“Check the runs of my Invoice Processing flow”* rather than *“Check my flows.”*
**Ask follow-up questions.** After seeing a failed run, ask *“What went wrong?”* or *“Show me the error details.”* Your agent remembers the context within a conversation.
**Let the agent handle the technical parts.** You do not need to provide environment IDs, flow GUIDs, or run IDs. The agent discovers these automatically. Just use display names.
**Tell the agent what you want to achieve, not which tool to call.** Say *“Fix the expression error and redeploy”* rather than *“Call update\_live\_flow.”*
**Ask for explanations.** After the agent finds an error, ask *“What does this error mean?”* or *“How should I fix this?”* The agent can explain Power Automate concepts and suggest fixes.
## Troubleshooting
If your first call does not work, check these common issues:
| - **HTTP 401 or 403**, API key is missing, expired, or malformed. Get a fresh key from [mcp.flowstudio.app](https://mcp.flowstudio.app?utm_source=hubspot&utm_medium=content&utm_campaign=learn-getting-started) - **“Bearer” in the header**, The header must be **x-api-key**, not `Authorization: Bearer`. This is the #1 setup mistake - **HTTP 400**, Malformed request. Ensure your agent is sending `Content-Type: application/json` - **No environments returned**, Your Microsoft account needs access to at least one Power Platform environment - **“Approval required” when connecting Power Automate or Power Apps**, Your organization blocks the permission prompt. Connect with a [browser key](https://learn.flowstudio.app/mcp-browser-key?hsLang=en) instead - **Codex: connection timeout**, Check that internet access is enabled and `mcp.flowstudio.app` is in the domain allowlist - **“Plan limit reached” (MCP error -32000)**, You have exceeded your plan’s MCP call allowance. Enable overage billing or upgrade your plan on your [dashboard](https://mcp.flowstudio.app?utm_source=hubspot&utm_medium=content&utm_campaign=learn-getting-started). Note: the `tools/list` discovery call is free and does not count against limits - **No delete or restore tools**, They are off until you switch them on under **Agent tools** on your dashboard. Reconnect your agent afterwards; it only reads the tool list when it connects - **No canvas app tools**, Reconnect your agent once; it only reads the tool list when it connects - **Agent doesn’t know about FlowStudio tools**, Verify the MCP server appears in your agent’s tool list. In VS Code, check the MCP server icon in the status bar. If the server isn’t listed, your config file may be in the wrong location or has a syntax error |
| --- |
## Learn more: FlowStudio MCP on Microsoft’s The Low Code Revolution
John Liu on how FlowStudio MCP lets AI agents read, debug, and build Power Automate flows without opening the portal.
Video: Beyond Copilot: AI Agents That Build, Debug and Govern Power Automate Flows (36 min)
## What’s next
- [Debug Power Automate Flows with MCP](https://learn.flowstudio.app/mcp-debug?hsLang=en), Step-by-step guide to finding and fixing flow failures
- [Build Power Automate Flows with MCP](https://learn.flowstudio.app/build-power-automate-flows-with-ai-agents?hsLang=en), Create and deploy flows from natural language
- [MCP Tools Reference](https://learn.flowstudio.app/mcp-tools?hsLang=en), Complete catalog of all 30+ tools
- [Copilot Agent Skills](https://learn.flowstudio.app/mcp-copilot-skills?hsLang=en), Pre-built skills for GitHub Copilot
*FlowStudio is an independent product and is not affiliated with, endorsed by, or sponsored by Microsoft Corporation. Microsoft, Power Automate, Power Platform, and Copilot are trademarks of the Microsoft group of companies.*
[](https://flowstudio.app)
flowstudio.app
---
[Go to FlowStudio MCP](https://mcp.flowstudio.app/)
[Go to FlowStudio App](https://flowstudio.app/)
[youtube icon](https://www.youtube.com/playlist?list=PLXiXrMydfoLYzS-Ya3yOmYvfEyLbkXhpQ) [linkedin-in icon](https://www.linkedin.com/company/flow-studio-solutions/about/) [envelope icon](mailto:support@flowstudio.app) [link icon](https://flowstudio.app/)
Copyright © 2026, Flow Studio Solutions
```json
{
"@context" : "https://schema.org",
"@type" : "Organization",
"alternateName" : "FlowStudio MCP",
"description" : "FlowStudio is the maker of FlowStudio MCP, an independent MCP server for Microsoft Power Automate. FlowStudio MCP lets AI agents (ChatGPT, Microsoft Copilot Studio, GitHub Copilot, Claude, OpenAI Codex, and any MCP-compatible agent) read, debug, build, and govern Power Automate cloud flows.",
"name" : "FlowStudio",
"sameAs" : [ "https://www.youtube.com/@ninihen", "https://www.youtube.com/@JohnLiuNet", "https://github.com/github/awesome-copilot/tree/main/skills/flowstudio-power-automate-mcp", "https://github.com/github/awesome-copilot/tree/main/plugins/flowstudio-power-automate", "https://github.com/ninihen1/power-automate-mcp-skills", "https://marketplace.visualstudio.com/items?itemName=FlowStudio.flowstudio-mcp", "https://marketplace.visualstudio.com/items?itemName=FlowStudio.flowstudio-mcp-claude", "https://open-vsx.org/extension/FlowStudio/flowstudio-mcp-claude", "https://glama.ai/mcp/servers/ninihen1/power-automate-mcp-skills", "https://www.claudepluginhub.com/plugins/ninihen1-flowstudio-power-automate", "https://www.linkedin.com/company/flow-studio-solutions/" ],
"url" : "https://mcp.flowstudio.app"
}
```
```json
{
"@context" : "https://schema.org",
"@type" : "HowTo",
"description" : "Connect FlowStudio MCP to a Microsoft Copilot Studio agent so any M365 Copilot user in your tenant can use Power Automate tools from Teams chat or m365.cloud.microsoft.",
"name" : "Install FlowStudio MCP for Microsoft Copilot Studio",
"step" : [ {
"@type" : "HowToStep",
"name" : "Get an API key",
"text" : "Sign up at mcp.flowstudio.app, grant Power Automate and Power Apps permissions, copy your API key from the dashboard."
}, {
"@type" : "HowToStep",
"name" : "Open Copilot Studio",
"text" : "Open copilotstudio.microsoft.com, create a new agent or open an existing one, and go to the Tools tab."
}, {
"@type" : "HowToStep",
"name" : "Add an MCP server",
"text" : "Click Add a tool, then in the Create new row click the Model Context Protocol card."
}, {
"@type" : "HowToStep",
"name" : "Fill the connection form",
"text" : "Server URL https://mcp.flowstudio.app/mcp, Authentication API key, Type Header, Header name x-api-key (lowercase with hyphen). Click Create."
}, {
"@type" : "HowToStep",
"name" : "Publish to Teams or M365 Copilot",
"text" : "Click Publish in the top right and pick the Microsoft Teams and Microsoft 365 Copilot channels."
} ]
}
```
```json
{
"@context" : "https://schema.org",
"@type" : "HowTo",
"description" : "Add FlowStudio MCP to GitHub Copilot Chat in Visual Studio Code so Copilot can read, debug, and modify Power Automate cloud flows.",
"name" : "Install FlowStudio MCP for GitHub Copilot in VS Code",
"step" : [ {
"@type" : "HowToStep",
"name" : "Install the VS Code extension",
"text" : "Open VS Code, press Ctrl+Shift+X, search for FlowStudio MCP, install the Power Automate MCP Server extension from the Marketplace."
}, {
"@type" : "HowToStep",
"name" : "Get an API key",
"text" : "Sign up at mcp.flowstudio.app, grant Power Automate permissions, copy your API key."
}, {
"@type" : "HowToStep",
"name" : "Add the API key",
"text" : "In VS Code, run the command FlowStudio MCP: Add API Key. The extension stores the key in your OS keychain."
}, {
"@type" : "HowToStep",
"name" : "Verify in Copilot Chat",
"text" : "Open GitHub Copilot Chat in VS Code. The MCP server is registered automatically. Ask: list my Power Automate flows."
} ]
}
```
```json
{
"@context" : "https://schema.org",
"@type" : "HowTo",
"description" : "Connect FlowStudio MCP to Claude Code (the Anthropic Claude CLI and VS Code extension) so Claude can build, debug, and operate Power Automate flows.",
"name" : "Install FlowStudio MCP for Claude Code",
"step" : [ {
"@type" : "HowToStep",
"name" : "Install the Claude Code extension or use the CLI",
"text" : "Either install the Power Automate MCP for Claude Code extension from the VS Code Marketplace or Open VSX, or install the plugin via the claude CLI: git clone https://github.com/ninihen1/power-automate-mcp-skills.git then claude --plugin-dir ./power-automate-mcp-skills."
}, {
"@type" : "HowToStep",
"name" : "Get an API key",
"text" : "Sign up at mcp.flowstudio.app, grant Power Automate permissions, copy your API key."
}, {
"@type" : "HowToStep",
"name" : "Connect the MCP server",
"text" : "Run: claude mcp add --transport http flowstudio https://mcp.flowstudio.app/mcp --header \"x-api-key: YOUR_API_KEY\"."
}, {
"@type" : "HowToStep",
"name" : "Verify",
"text" : "Reload Claude Code. Ask: list my Power Automate environments. The 30+ FlowStudio MCP tools and 5 bundled skills (power-automate-mcp, power-automate-debug, power-automate-build, power-automate-monitoring, power-automate-governance) are now available."
} ]
}
```
```json
{
"@context" : "https://schema.org",
"@type" : "HowTo",
"description" : "Connect FlowStudio MCP to the Claude Desktop app on Windows or macOS using the mcp-remote bridge.",
"name" : "Install FlowStudio MCP for Claude Desktop",
"step" : [ {
"@type" : "HowToStep",
"name" : "Install Node.js",
"text" : "Claude Desktop reaches the remote MCP server via the mcp-remote npm package. Install Node.js if you do not have it."
}, {
"@type" : "HowToStep",
"name" : "Open the Claude Desktop config file",
"text" : "On Windows: %APPDATA%\\Claude\\claude_desktop_config.json. On macOS: ~/Library/Application Support/Claude/claude_desktop_config.json."
}, {
"@type" : "HowToStep",
"name" : "Add the FlowStudio MCP entry",
"text" : "Add a mcpServers.flowstudio entry that runs npx mcp-remote@latest https://mcp.flowstudio.app/mcp with x-api-key and User-Agent FlowStudio-MCP/1.0 headers."
}, {
"@type" : "HowToStep",
"name" : "Restart Claude Desktop",
"text" : "Close and reopen Claude Desktop. The FlowStudio MCP tools become available."
} ]
}
```
```json
{
"@context" : "https://schema.org",
"@type" : "HowTo",
"description" : "Connect FlowStudio MCP to the OpenAI Codex Desktop app or CLI. Both use the x-api-key header (do not use Authorization: Bearer).",
"name" : "Install FlowStudio MCP for OpenAI Codex",
"step" : [ {
"@type" : "HowToStep",
"name" : "Get an API key",
"text" : "Sign up at mcp.flowstudio.app and copy your API key from the dashboard."
}, {
"@type" : "HowToStep",
"name" : "Codex Desktop: add the MCP server",
"text" : "Settings, MCP servers, Add server. URL https://mcp.flowstudio.app/mcp. Bearer token env var: leave empty. In Headers from environment variables, add x-api-key mapped to FLOWSTUDIO_API_KEY. Save."
}, {
"@type" : "HowToStep",
"name" : "Codex CLI: add to config.toml",
"text" : "Add a [mcp_servers.flowstudio] block with url https://mcp.flowstudio.app/mcp, plus a [mcp_servers.flowstudio.env_http_headers] block with x-api-key = FLOWSTUDIO_API_KEY. Set the FLOWSTUDIO_API_KEY environment variable before launching Codex."
}, {
"@type" : "HowToStep",
"name" : "Allow network access for Codex CLI",
"text" : "Codex CLI blocks network by default. Add mcp.flowstudio.app to the domain allowlist in the Codex sandbox settings."
} ]
}
```