A failed flow sends an HTTP trigger. A Copilot Studio agent reads the run history, produces a...
How do I document my Power Automate flows? Same forum question as Post 1, second answer.
Post 1 showed the developer path: an AI coding agent in an IDE, plus a SharePoint service principal. Fast if you have that setup. Not useful if you want the work to happen inside Microsoft 365.
This post is the no-IDE version. One Copilot Studio agent, two tools, and the same documentation spec: 6 inventory columns and 7 sections per flow.
I didn't open Power Automate designer, the SharePoint admin centre, or Azure once.
What it took:
- One prompt (a paragraph)
- Two tools wired in (Work IQ SharePoint for the file system, FlowStudio MCP for Power Automate)
- One spec: the 6 inventory columns and 7 page sections I wanted, written into the prompt itself. No pre-built template page attached; the agent assembled the Word docs from the section list.
The agent picked up the three flows I seeded for the pilot, drafted a Word doc per flow, and registered each in the inventory list.
What I set up
One Copilot Studio agent. Two tools.
Tool 1: Work IQ SharePoint. This is Microsoft's preview SharePoint tool for Copilot Studio agents. In my tenant, Work IQ SharePoint let the agent read the target SharePoint site, create files in a document library, and write rows to the inventory list. It is preview, so check the current Work IQ SharePoint connector reference before relying on the same capability in your tenant. against your tenant.
|
Important limitation up front. Work IQ SharePoint does NOT have access to the Site Pages REST API. It can write Word docs and list items, but it cannot create or modify SharePoint Site Pages. If you want the agent to publish actual Site Pages (with rich rendering, shareable URLs, mermaid SVG diagrams in the body) instead of Word docs sitting in a library, that's Post 3's job, using a Power Automate dispatcher flow to fill the gap. This post stays with Word docs because that's what Work IQ can actually do. |

Tool 2: FlowStudio MCP. Same MCP server I use in the IDE, plugged in via the Model Context Protocol card in the Copilot Studio Tools dialog. Server URL is https://mcp.flowstudio.app/mcp, auth is API key on the x-api-key header. Microsoft shipped first-class MCP server support in Copilot Studio in 2025, so this is using the supported integration surface, not a workaround. The full 5-step setup is in my earlier Copilot Studio post; the only difference here is what I'm asking the agent to do once it's connected.
Copilot Studio also needs generative orchestration enabled so the agent can decide when to call the MCP tools.
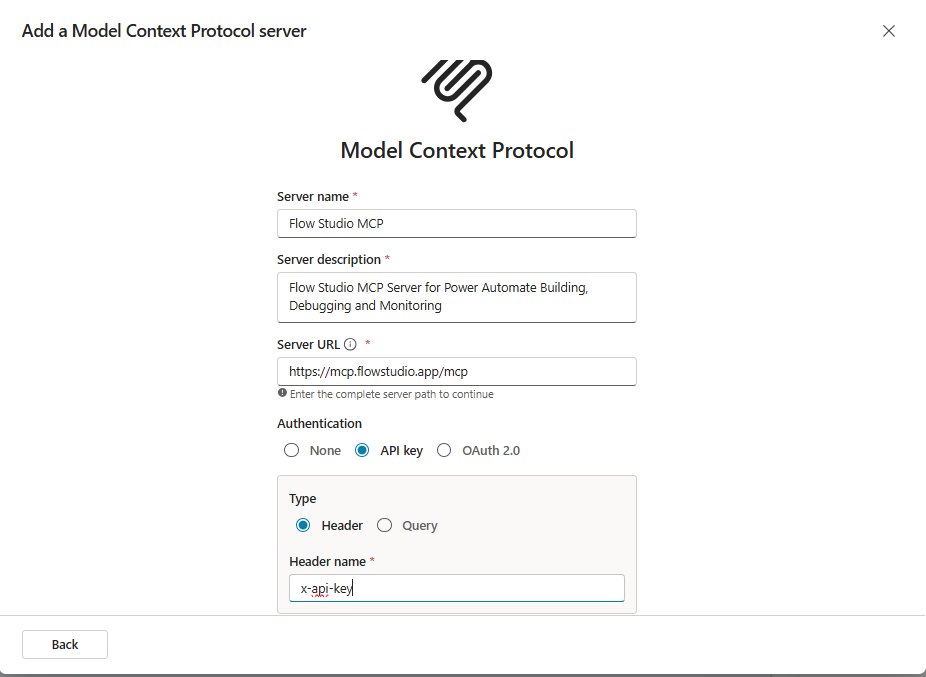
Figure: The FlowStudio MCP server form in Copilot Studio: Server URL, API-key auth, and Header name x-api-key.
That's the whole architecture. No solution import, no custom connector, no service identity. Both tools sit at the Agent → Tools layer and run as the signed-in user.
Security note: this is still a write-capable agent if you have globally enabled all actions. Limit who can use it, start with read-only MCP tools where possible, and only enable write tools for users who should be allowed to create documentation or update SharePoint content.
What the agent did
The Copilot Studio agent calls the same MCP tools through the same server as in Post 1, so the agent runtime produces equivalent output; the difference is the surface, not the data path.
The process is super simple:
I opened the agent in the Copilot Studio test pane and gave it one prompt, and within minutes the documents were created and items listed.
Figure: The Copilot Studio test pane after the run: each tool call in order (Work IQ SharePoint, list_live_environments, list_live_flows, three get_live_flow reads, then the Work IQ writes), ending in the "Flow Documentation Complete" summary.
▸ Prompt to the agent
Document the flows in the Flow Studio Demo environment. For each flow, create a word document with these 7 sections in order: (1) What is this flow for, (2) How it is triggered, (3) Other inputs, (4) The process in plain language, (5) Relevant tools and systems, (6) A flow chart (mermaid → SVG), (7) Appendix of action inputs and parameters. Save it into document library on https://johnliu365.sharepoint.com/sites/MCPDemo/CopilotDoc. Then add a row to the FlowDocsInventory2 list with Title, TriggerType, FlowURL, PageURL (the Word doc's URL), RelevantTools, and Summary.
Start with the three flows we picked for the doc-automation pilot: SQL Server 2025 GDR Monitor, MCPDemo #11 Upload Approval Process with Validation, and Weekly Pending Approvals Summary.
The agent worked through it in three visible passes, every tool call showing up in the reasoning sidebar:
| Step | Tool | Result |
|---|---|---|
| 1 | list_live_environments |
Find the Flow Studio Demo environment |
| 2 | list_live_flows |
List flows in that environment |
| 3 | get_live_flow |
Read each selected flow definition |
| 4 | Work IQ SharePoint | Create the Word document |
| 5 | Work IQ SharePoint | Add the inventory list item |
For the SQL Server 2025 GDR Monitor flow, it produced this:
Figure: One of the Word documents the agent produced: flow metadata up top, then what the flow is for, how it is triggered, and its inputs.
Then it called Work IQ a second time to add the inventory row, with the doc URL filled in from the SharePoint response. Three flows, three Word docs in /MCPDemo/CopilotDoc, three inventory rows.
One real-world detail to note: Work IQ writes the docs as draft items in the document library; the signed-in user owns them and shares them like any other file. Mermaid blocks won't render as diagrams in any stock SharePoint surface; you need pre-rendered SVG (which the section spec uses) or a custom SPFx web part. If rendered diagrams matter to your readers, that's the trade you make for staying inside Work IQ's capabilities. The Site Pages-rendered version of the same template is what Post 3 covers.
I never opened Power Automate designer or SharePoint during any of it.
The doc spec
The per-flow Word doc and the inventory list both use the same section spec I described in Post 1: 7 sections inside each Word doc (What this flow is for, How it is triggered, Other inputs, The process, Relevant tools and systems, Flow chart as Mermaid text, or as a pre-rendered SVG if you need the diagram visible without a Word add-in, and Appendix: action inputs and parameters), and 6 inventory columns (Title, TriggerType, FlowURL, PageURL, RelevantTools, Summary). I didn't reinvent it for this architecture, and I'd recommend you don't either. The moment you have flows on two architectures across two tenants, a shared spec is the only thing that makes the docs comparable.
|
If you take one thing from this post No service principal. No Azure CLI. No developer in the loop. The agent writes documentation under your identity, the audit trail follows you, and approved user with M365 Copilot access, agent access, SharePoint permissions, and a valid MCP connection can run the same pattern. The cost: Word docs in a library, not Site Pages. |
Why this approach over the other two
I want to be honest about the tradeoffs, because all three architectures in this series work and they're not interchangeable.
The IDE path in Post 1 gives you a developer experience and full Graph access via a Service Principal. You can write Word docs OR Site Pages, you can grep, you can pause the agent mid-loop. It assumes you have an IDE open and a Service Principal you trust.
This Copilot Studio + Work IQ path gives you tenant-wide reach. Anyone in your tenant with an M365 Copilot license can run the agent from the same Copilot chat they already use, no install, no Azure config. The agent runs as the signed-in user, so the audit trail is theirs, not a service identity's. The cost: Work IQ can write Word docs but not Site Pages, so the output sits in a document library rather than rendering as a SharePoint page.
If the document-library output is the wall you hit and you still want a no-IDE solution, Post 3 wires a Power Automate dispatcher flow into the same Copilot Studio agent to give it Site Pages REST access through a flow. Same audience, same agent surface, but pages instead of docs.
Pick this Work IQ path if Word docs in a document library are good enough for your reviewers. Pick Post 1 if you have a developer in the room. Pick Post 3 if you need agent-published Site Pages without an IDE.
Try it in your tenant
- Get a FlowStudio MCP API key at mcp.flowstudio.app. Free starter plan includes 100 calls.
- Add FlowStudio MCP as a tool on your Copilot Studio agent following the Getting Started guide.
- Add Work IQ SharePoint as a tool on the same agent and grant it access to a SharePoint site you control. Make sure the agent has read/write on both your inventory list and the docs library you want it to write to.
- Drop the prompt above into the test pane, point it at one environment, and start with three or four flows you understand well so you can sanity-check the docs before batching the rest.
For a developer-first read path, see Post 1, where I also talk about when PAC CLI may be enough.
About FlowStudio MCP: FlowStudio MCP is a Model Context Protocol server that gives AI agents action-level visibility into Power Automate. It's listed on GitHub's awesome-copilot. Works with Microsoft Copilot Studio, GitHub Copilot, Claude, and any MCP-compatible agent.
Related reading:
- Document Power Automate flows with GitHub Copilot, Claude, or Codex (Post 1)
- Teaching a Copilot Studio agent to write its own SharePoint pages (Post 3)
- How to plug a custom MCP server into Microsoft Copilot Studio in 5 minutes
Catherine Han, FlowStudio